 Hope you can join co-hosts @Graphite and @LisaSuhr on April 6, 2016 at 6:00 pm CST, 4:00 PST using hashtag #CSEDchat.
#CSEDchat on Storytelling–April 6, 2016
Leave a reply
Hope you can join co-hosts @Graphite and @LisaSuhr on April 6, 2016 at 6:00 pm CST, 4:00 PST using hashtag #CSEDchat.
I’m getting ready to try my hand at my first opportunity to co-host a Twitter Chat and I wanted to make a brief guide for some of my colleagues who might have never taken part in a Twitter Chat before! So this guide assumes first that you have a Twitter Account. If you are brand new to Twitter, a better place to start is here: http://cybraryman.com/twitterforbeginners.html. Otherwise, follow these steps and tips to make a Twitter Chat a good experience:
Digital Learning happens every day in USD 113 Prairie Hills. But to celebrate Digital Learning Day 2016, I asked teachers to send in photos that I could put together into a video to showcase several examples of what that looks like. I was impressed with the thoughtful integration of digital learning that happens at all grade levels in all subject areas! Here is the final product:
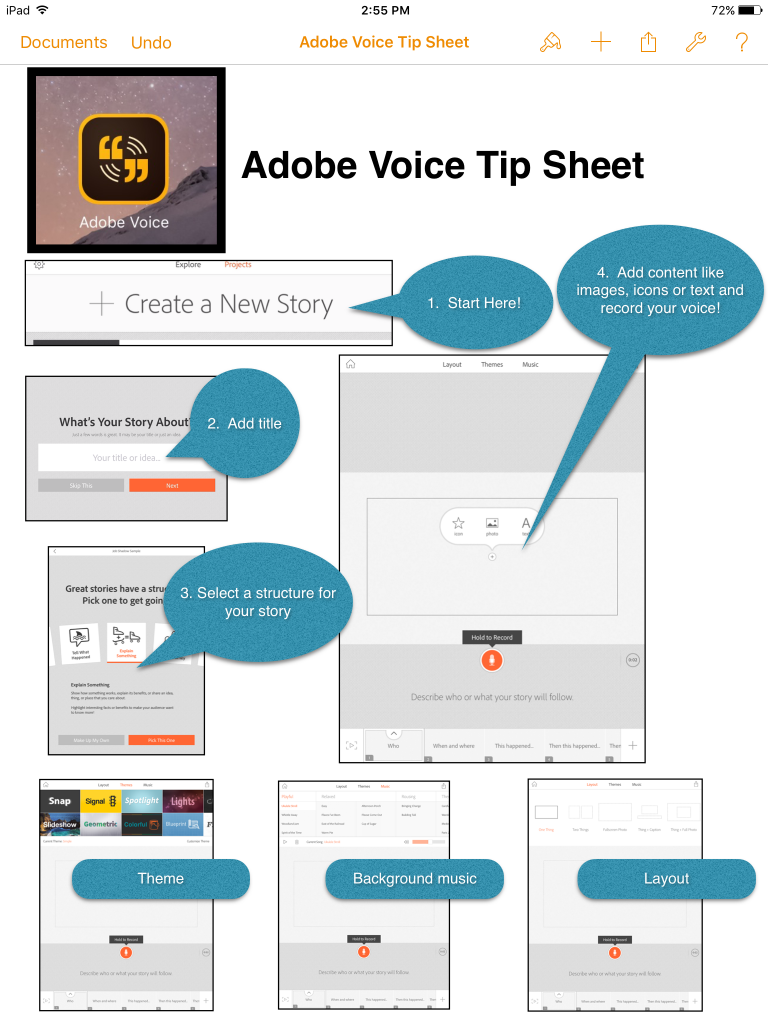
As part of our district’s emphasis on college and career readiness for our students, in a few weeks all teachers are going to get a 1/2 day to visit local businesses to learn more about how their content and/or the “soft skills” we teach students are applicable to today’s employers. Following the visit, we are expected to create a digital artifact of our visit. I’ve been brainstorming all the cool ways these visits could be documented, and I’ve created a tip sheet for a fairly new free app that I’ve been experimenting with and plan to use to document my own visit for the day: Adobe Voice. I’ve created a tip sheet for new users of Adobe Voice that can be downloaded from this link: Adobe Voice Tip Sheet. The screen shot in this post is of my tip sheet.
Adobe Voice allows the user to insert images of their own OR icons from their vast library, then record audio narration over the top. Multiple images can be added to tell a story and the app even has its own background music and themes to choose from. Once you’re done the app saves directly down to your photo library on your iPad as movie file . . . that’s right . . . a movie file!! How cool is that? (I just had a little flash back to my old Windows Photostory days, only Adobe Voice is way easier!!)

Image of workers in Section of Vital Statistics (Census): 1909
Isn’t this a cool picture of workers in the Census Bureau from 1909? I found it on the Library of Congress website at www.loc.gov? I can’t imagine what it would have been like to be a statistician 100 years ago! Technology makes statistical analysis so much easier and quicker!
Today’s blog post is for teachers whose standards include the teaching of statistics. These resources were gleaned from a MOOC I planned to participate in called Teaching Statistics Through Investigations. Unfortunately I didn’t get to fully participate in this MOOC, but I was able to glean some useful information that I wanted curate here in this post.
First, Tech Tools:
http://www.jake4maths.com/grapher/
Next, YouTube Playlists:
TSDI-Unit Introduction Videos:
https://www.youtube.com/
TSDI-Expert Panel Discussions in Statistics Education:
https://www.youtube.com/
TSDI-Animated Illustrations of Students’ Statistical Reasoning:
https://www.youtube.com/
TSDI-Instructional Support Videos in Statistics Education
https://www.youtube.com/
TSDI-Other videos we used from YouTube:
https://www.youtube.com/
And finally, an opportunity to subscribe to a newsletter for K-12 teachers of statistics:
The Statistics Teacher Network (STN) is a free newsletter published by the ASA/NCTM Joint Committee on Curriculum in Statistics and Probability for Grades K-12. Issue 86 of STN is now online atwww.amstat.org/education/stn.
Here is a Great video on using Google Classroom!
In today’s blog post, I’m sharing a video I ran across through a useful resource I use to learn about Google Tools: www.thegooru.com. I’m often asked by staff to show them quickly how to use Google Classroom, but this tool has become more than a “quick share,” so I’m hoping that being able to help folks create their first classroom and then sending them to this blog post will be useful!
This video is about 50 minutes long, but you can forward through the first part of the video because this is a recording of a live webinar and the first 6 minutes (or so) are the presenter inviting the live viewers to join his Google Classroom account so they have live participation. As a viewer of the archived video, I just suggest you forward in the video to about 6:15 and start it there. (This should make the viewing length about 45 minutes total.) The video was published in September of 2015, so as of today, it is pretty current on what Google Classroom can do.)
Graphite.org is a great place to find tech resources vetted by teachers and organized in an easily searchable way. Graphite Educators can create lesson flows that show how tech resources can be put tog ether in a logical flow for a tech-rich experience for your students. I recently completed a lesson flow on how we use several technology resources together to introduce coding to students at the elementary level. You can read my lesson flow here: Hour of Code Lesson Flow. I’m also excited to get to take three teachers with me to do a college and career visit to a local business that employs programmers this year. We hope to be able to help our students make even more meaningful connections as we have them work on coding in the future since we will be increasing our own understanding of careers in computer science as a part of the visit.
The screen shot accompanying this post from Box Island a new coding app I plan to use with 3rd graders this year during the Hour of Code week!
Why? One simple word can make all the difference. Whether planning a learning experience for young people or adults, “Why?” is an important place to start. Today during the early Saturday morning educational Twitter chat I like to participate in, #SatChat, someone shared the following video, that made me start thinking about that little word: “why?” Take a few minutes to watch:
Watching the video and reflecting a few minutes on it, reminded me of a conversation I’d had a day or two ago with colleague where I shared some thoughts I had after watching a TED Talk given by Simon Sinek, the author of “Start with Why.” A few months back, I jotted a little “note-to-self” to look up “Sinek’s Golden Circle,” probably after reading about it on a blog or seeing it mentioned in a webinar. I can’t even recall today where my first exposure to it was, but I can tell you that it motivated me enough to write myself a reminder to learn more about it! I ran across my note the other day on one of the many Post-it notes that are on my desk, and I took a little break from work to start my research. I started by Googling the phrase and looking at some of the images that came up. I dug into the concept a bit more and came across the following video of Sinek giving a TED Talk on his ideas. The video is at the bottom of this post; it’s a little longer, but worth the watch. I started thinking of all the applications the idea of “starting with why” has in the field of education, and I began to believe it is an important reminder to us as educators. Children, young adults and especially adult learners we work with need to know the “WHY?” behind what we are teaching them.
Just as important as activating prior knowledge, explicitly pointing out the learning objectives for the lesson, or framing lessons within essential questions, the learners we work with need to know why what we have to say is important. And for us to convey “The Why” to our students, we have to be able to articulate “The Why” ourselves. So I challenge you today to add a step to your lesson planning or professional development planning that focuses on “The Why” of time you’ll spend with your learners. What is “The Why?” How will you communicate “The Why?” See how it changes your planning process and delivery of your lesson or professional development!
Here is a favorite go-to recipe that I use when I’m super busy. Maybe I know my calendar for the day (or week) is full. Or maybe I really need some down-time to sit and read because I’ve been so busy. Maybe I just had some professional learning and I really need “play time” to experiment with a new idea. If it was just me at home, I’d probably just cut an apple and dip the slices in peanut butter and call that supper. But for some reason, other people think we need to eat real meals!! So this is a quick go-to recipe that I can add a salad or some type of hot potato and vegie to and satisfy those other people. It is easy to get ready early in the morning or at night. You can spread out the cooking/serving over two days. In fact, it’s better that way!
BBQ Brisket
2-4 lbs. beef brisket
Liquid smoke
Salt, pepper, onion powder, garlic powder (use what you have and like)
Rub the brisket surface with liquid smoke to wet, then sprinkle generously on the seasonings you like. Salt alone is enough. Wrap the meat tightly in foil and bake at 275 degrees for 1 hour per pound of your brisket. Remove the meat from the oven and let cool.
At this point, I put the meat in the refrigerator over night or even for a couple of days. When I know I need the quick meal, I pull it out, slice it across the grain for added tenderness and put it in a 9×13 pan. I cover it with whatever bottle of BBQ sauce was on sale most recently at our grocery store, cover with foil and bake for about another hour at 300 degrees. You can also put the slices and BBQ sauce in a crock pot to simmer while you’re at work. Be sure to use the low setting.
I’ve got a brisket in the oven for the “first round cook” right now, and I’ll be sure to snap a photo and add to this post when it is done!!
One of our optional tech training sessions I offered this summer was all about taking your professional learning into your own hands using technology tools. I put the resources I shared with participants into a LiveBinder to organize things and share some of my own thoughts and challenges with them, and I wanted to make it a little more accessible. So I’m posting access to the “binder” here on by blog as an embedded object for you all to use! Take a minute to comment and let me know what you like and what I should add to this binder! And have a great time learning about the things you’re passionate about!!
Click here to open this binder in a new window.